
TL;DR
Moving your rig into a closet or another room is the most effective way to cut noise. Proper placement of acoustic panels, sealing gaps, and managing heat are key to making a closet a usable, quiet space for work or recording.
Imagine a tiny closet packed with a noisy AI workstation. It’s loud, echoey, and disruptive. Now, what if I told you that simply relocating it—out of sight, out of mind—could cut noise by 90%? That’s the power of strategic placement. Today, we’re unpacking how to turn that cramped, echo-prone closet into a quiet, efficient workspace or recording space, without breaking the bank.
You’ll learn why moving your rig beats fancy acoustic foam, how to treat a closet for sound, and the key secrets to keeping your hardware cool while muffling the noise. Ready to make your tiny space work smarter, not harder? Let’s go.
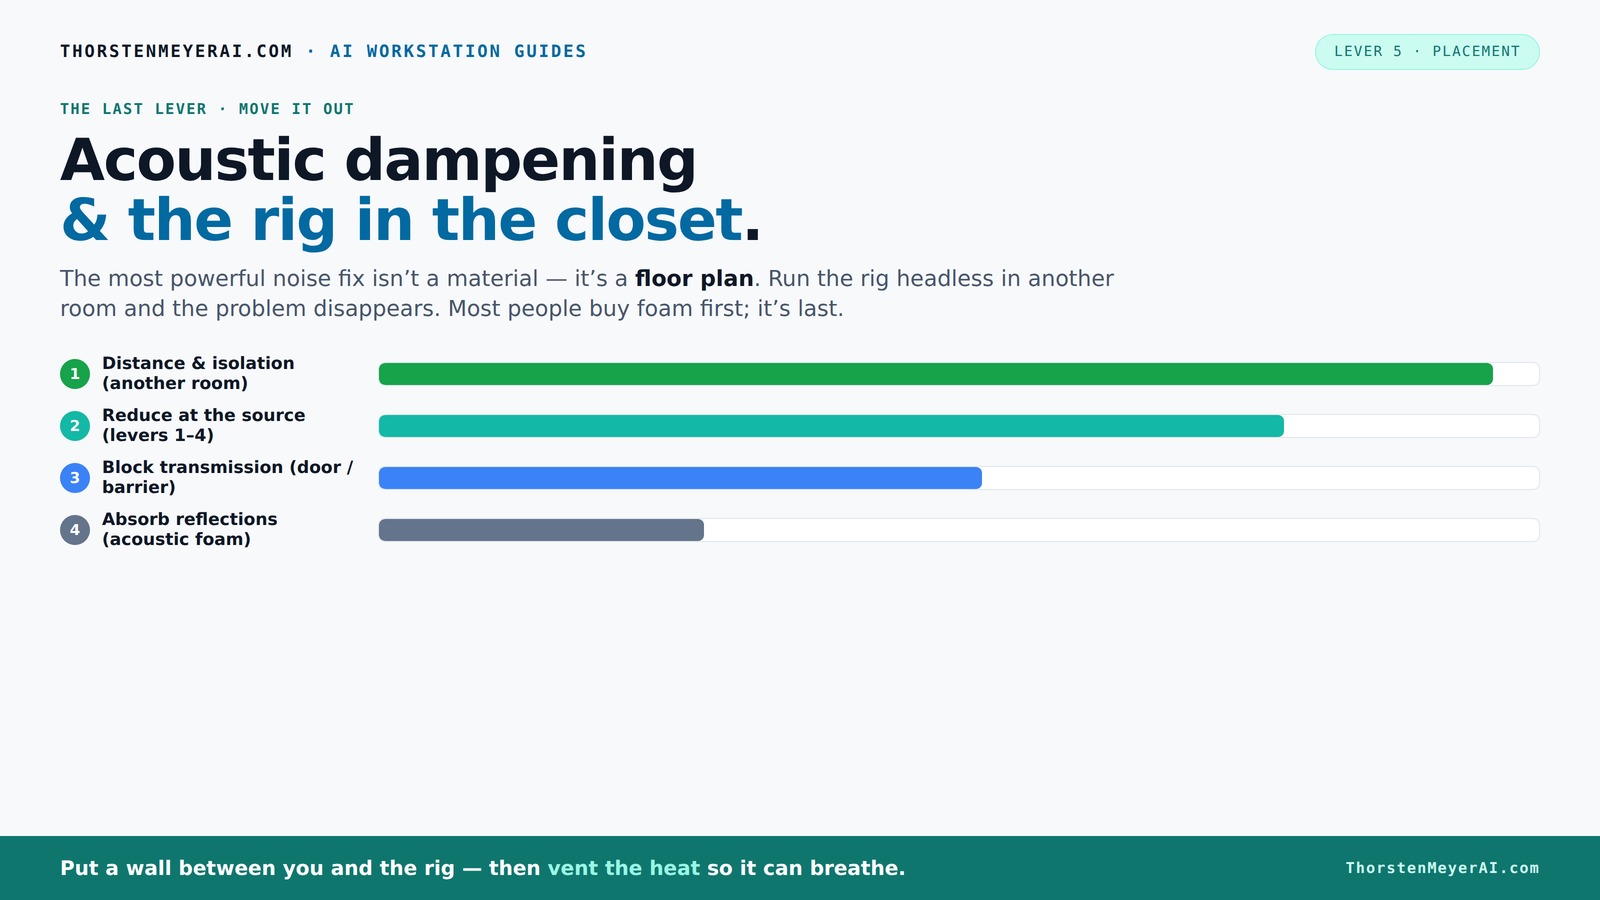
Acoustic dampening
& the rig in the closet.
The most powerful noise fix isn’t a material — it’s a floor plan. A rig you can’t hear because it’s in another room beats any amount of foam. Tap the approaches in Part 1 to see what actually works.
(another room)
(levers 1–4)
(door / barrier)
(acoustic foam)
Contain the noise, not the heat
Key Takeaways
- Moving your rig into another room or closet is the most effective way to cut noise without expensive treatments.
- Ventilation is critical—sealed spaces trap heat, which can damage hardware and cause fans to roar.
- Layered treatment—combining acoustic panels, sealing gaps, and bass traps—gives the best sound control in small spaces.
- Focus on treating reflection points and corners to reduce echo and low-end issues effectively.
- Affordable fixes like blankets, rugs, and weatherstripping can dramatically improve your closet’s sound quality without full renovations.

Focusound 52 Pack Acoustic Foam Panels 1" x 12" x 12" Sound Proof Foam Panles Soundproofing Noise Cancelling Wedge Panels for Home Office Recoding Studio with 300PCS Double-Side Adhesive
- Soundproofing Design: Triangular grooves for noise absorption
- Includes Adhesive Tape: 300pcs double-sided adhesive for easy installation
- Easy Shape Recovery: Reforms shape after soaking in water
As an affiliate, we earn on qualifying purchases.
As an affiliate, we earn on qualifying purchases.
Why Moving Your Rig Is the #1 Noise Fix (And the Easiest)
Placing your noisy machine far away from your ears works better than dozens of foam panels. When your rig is in another room or closet, you don’t hear the hum or fan noise. It’s that simple. This method is like turning down the volume at the source, which is the most effective way to quiet a loud system.
Imagine working on your laptop in a quiet corner, while your powerful GPU rig roars in the basement. You hit your API, and the noise stays behind closed doors. This approach saves money and effort and minimizes echo or reflections in your actual workspace.
Practically, you need a stable network connection—preferably wired—and a way to keep the rig cool. The secret: you don’t need to be next to your hardware to control or monitor it. The physical distance is the true noise killer.
How to Set Up a 'Rig in the Closet' Without Turning It Into a Sauna
Putting a high-powered machine in a closet sounds perfect—except for one big problem: heat. Trapped heat can cook your hardware, causing throttling and loud fan noise. The key is to give your rig a way to breathe.
Here’s how: Learn more about acoustic dampening and placement.
- Install passive vents or small holes to allow airflow.
- Add an exhaust fan—quiet, thermostatically controlled if possible—to pull hot air out.
- Use ducting to direct heat outside or into a well-ventilated space.
- Consider a purpose-built soundproof cabinet with integrated cooling systems, which combine acoustic foam with temperature control. Check out more about cooling your rig here.
Remember, sealed spaces trap heat. Just like a car parked in the sun, a closed closet heats up fast. Ventilation is your best friend here.
Acoustic Dampening vs. Soundproofing: What's the Difference (And Why It Matters)
Acoustic dampening and soundproofing are like two sides of the same coin, but they serve different purposes. Dampening reduces echoes and reflections inside a space—making vocals clearer and sound less boxy. Soundproofing stops sound from escaping, keeping noise from leaking out or in.
For a closet, your goal is often a mix: dampen the echoes, seal the gaps, and block the sound from leaking through doors or cracks. Think of it as both softening the inside and building a barrier on the outside.
Effective methods include: acoustic dampening techniques.
- Acoustic panels on walls and ceiling for inside dampening
- Weatherstripping and acoustic sealant on doors and cracks for soundproofing
- Adding mass with drywall or damping compounds for better isolation
Thus, a layered approach—dampening plus sealing—is usually best. Foam alone won't stop your neighbor’s noise from creeping in.
Best Places to Put Acoustic Panels in a Closet for Clearer Sound
Where you install acoustic panels makes all the difference. The biggest reflection points are behind the mic, on the side walls, and the ceiling. For more tips, see offroadtopspeed.com. Covering these surfaces cuts down echo and reverberation, resulting in cleaner recordings.
Picture this: your mic is pointing at a wall with echo. Adding panels there absorbs those reflections. Similarly, placing panels on side walls reduces sound bouncing around the tiny space.
Pro tip: focus on the first reflection points. Use a mirror to find them—sit in your usual recording position, and move a mirror along the walls until you see the mic's reflection. That’s where panels will help most.
Don’t forget the floor. A rug or carpet can absorb reflections bouncing up from the ground. Bass traps in the corners tame low-end buildup and standing waves, especially in small, square rooms.
Understanding the importance of placement helps you target your treatment effectively. Improperly placed panels might not absorb the reflections where they matter most, leaving your space still echoey or boomy. Prioritizing reflection points ensures your efforts translate into real sound quality improvements, making recordings clearer and more professional.
Treat Corners, Doors, and the Ceiling to Stop Boomy, Echoey Sound
Corners are prime real estate for bass traps. These thick panels or foam blocks soak up low frequencies that tend to bounce and cause boomy, boxy vocals. Find out more about sound treatment at gearollab.com. Proper placement in corners prevents the buildup of low-end resonance, which can muddy recordings and cause a lack of clarity in the sound. Neglecting this can lead to a significant imbalance where low frequencies dominate, making your mix sound unnatural or muffled.
Doors are notorious leak points. Seal gaps with weatherstripping, acoustic sealant, or even heavy blankets. Think of it as wrapping your closet in a soundproof blanket. This reduces the noise leaking into nearby rooms and prevents sound from escaping, which is crucial if you’re recording or trying to keep noise contained.
The ceiling can reflect sound down onto your mic, creating a hollow, echoey environment. Mounting acoustic panels or foam tiles overhead can dramatically improve clarity. This is especially true in small spaces where sound bounces quickly between parallel surfaces.
Remember: small spaces tend to echo because of parallel surfaces. Slightly angling panels or adding diffusers can help break up standing waves and smooth out the sound, preventing resonance peaks that color your recordings or listening experience. For more on acoustic treatments, visit fluidfixers.com.
Budget Fixes for a Better Closet Recording Space (No Full Renovation Needed)
You don’t need to tear down walls to get decent sound. Simple, low-cost fixes can make a big difference. Think moving blankets, thick rugs, and strategic panel placement. These DIY solutions can significantly reduce echo and improve sound clarity without major investment.
For under $100, you can:
- Hang moving blankets over doors and walls to absorb reflections and reduce sound leakage.
- Lay down a thick rug or carpet to absorb floor reflections, especially in small rooms where sound bounces from below.
- Use inexpensive foam panels on reflection points to target specific echo sources.
- Seal gaps with weatherstripping or acoustic sealant to prevent sound leaks.
While these fixes aren’t a substitute for professional treatment, they can dramatically improve your space’s acoustic environment and help you achieve cleaner recordings and more controlled sound. Combining these tactics with ventilation improvements and sealing strategies offers a balanced approach that maximizes your budget and space.
Common Mistakes That Ruin Closet Soundproofing and How to Avoid Them
Many DIYers focus on buying foam and forget the basics—like sealing gaps and managing heat. Gaps around doors or vents let noise leak out, rendering your efforts ineffective. Additionally, sealing the space completely without providing ventilation traps heat, risking hardware damage and causing fans to work harder, which increases noise. This tradeoff can undermine your entire setup.
Be aware of these pitfalls:
- Over-relying on foam without sealing gaps can create a false sense of security, as sound still escapes through unsealed openings.
- Sealing a closet completely without proper ventilation can lead to heat buildup, risking hardware failure and increasing noise from cooling fans.
- Ignoring low-frequency issues—bass traps are vital because low-end frequencies tend to travel and resonate in small, enclosed spaces, causing muddiness or boomy sound.
- Placing the rig directly on a resonant desk or surface can introduce vibrations and additional noise, reducing overall sound quality.
Fix these mistakes by paying close attention to gaps, adding appropriate ventilation, and treating low-end frequencies with bass traps. A balanced approach—combining sealing, treatment, and heat management—ensures your closet is both acoustically optimized and safe for your equipment.
When Is a Reflection Filter Enough, and When Do You Need More?
A reflection filter can be a quick fix for reducing room echo around your mic, especially in rental spaces or when structural changes aren’t allowed. It’s a portable shield placed behind the mic that absorbs sound reflections, effectively reducing early reflections that can muddy recordings. However, it’s limited in scope. If your closet is boomy, has low-end buildup, or leaks sound through gaps, a reflection filter alone won’t address these issues. It’s like putting a bandage on a larger problem.
For serious sound control, you need to treat walls, corners, or seal gaps. This involves adding acoustic panels, bass traps, and sealing cracks or doors to prevent sound leakage. Using a reflection filter is best as a supplementary tool—helpful for immediate improvement or portability— but it shouldn’t replace comprehensive treatment if you’re aiming for professional-quality sound. Combining it with proper placement of acoustic panels and low-frequency management yields the best results.
Frequently Asked Questions
How much of my closet should I treat to get good sound?
Start with the reflection points behind your mic, the ceiling, and the corners for bass traps. Covering about 50-70% of the reflective surfaces with panels or foam often yields noticeable improvements without full overhaul.Can I just use blankets instead of acoustic panels?
Blankets can help reduce reflections and echo, especially if hung strategically. However, they don’t absorb low frequencies well and won’t stop sound from leaking. Combining blankets with proper sealing and bass traps gives better results.Is foam enough to soundproof a closet for recording?
No, foam absorbs sound inside but doesn’t block sound from escaping. For serious soundproofing, you need sealing, adding mass, and sometimes structural modifications. Foam alone won’t keep noise from leaking out.How do I prevent my closet from becoming a heat trap?
Install ventilation, like passive vents or quiet exhaust fans, and avoid fully sealing the space. Creating airflow ensures heat doesn’t build up and keeps your equipment cool and quiet.Do I need bass traps in a small closet?
Yes, especially if the space sounds boomy or has uneven low frequencies. Bass traps in corners help tame low-end buildup and make vocals and instruments sound clearer.Conclusion
The best way to silence a noisy rig isn’t always buying more foam or panels. It’s about smart placement—moving it away, sealing gaps, and managing heat. Think of your closet as a puzzle: each piece—ventilation, treatment, sealing—brings you closer to a quiet, functional space that works for your workflow or recordings.
Remember, you don’t have to settle for a noisy closet. With a few strategic tweaks, you can turn even the tiniest space into a surprisingly effective and peaceful work zone. Now, go give your hardware the quiet home it deserves—and enjoy the peace of mind that comes with it.